Friday, March 23, 2012

Tie-Dyed Easter Eggs...Literally With Ties

As I guy, I often have numerious occassions when it's necessary for me to wear a tie.  I really enjoy dressing up and I'm intrigued by the fun patterns and prints of mens neck ties.   One day I decided to do a search for ways to incorporate the use of mens ties into home decor.  While doing so I ran across the oddest post in which they dyed Easter eggs with old silk neck ties.  I was really curious and pretty skeptical that this crazy process actually worked.  That meant that I had to try it...LOL. 


I made a quick trip to Goodwill and purchased a few ties in which to test this silly Easter project.  They cost me $0.99 a piece and the selection was pretty good.  The cashier and lady in line behind me bonded in fits of laughter as I explained what I was not going to be wearing these ties, rather using them to color Easter eggs.  It was a good time...LOL

After a little experimentation I was shocked to have had successfully dyed Easter eggs with silk neck ties.  I'm so glad that I decided to try this one out and highly recommend it to anyone who's looking for a fun, new way to color Easter eggs this year.

Supplies
Uncooked eggs
Glass or enamel cook pan (see note below)
  • Note: The original instructions I found for this project stated that only a glass or enamel pan would work for this dying process to occur.  I assumed it had something to do with the materials of the pan and the chemical exchange between the fabric and vinegar.  I'm always curious about the limitations so I did a second batch using my plain old saucepan.  The results were the same.
Silk ties (or anything made from silk)
Plain white fabric (I used and old t-shirt)
String or twist ties (I had the best luck with jute string)
Scissors
Vinegar
Water

Instructions
  • Prepare your tie for dying by cutting it open and apart.  Simply start on the backside of the tie and do some cutting and deconstructing.  It isn't terribly difficult to do. Remove all lining and tags from the main fabric.

  • Once you've prepared your fabric, cut a piece large enough to completely cover your egg, gathering it at the top or the bottom.
 

  • Wrap an uncooked egg with the printed side of the silk fabric facing the egg. I found that jute string was the easiest type of string to use.  It often held itself in the tied position with just one pass through and didn't need to be knotted.

  • Cut a similar sized piece (enough to wrap the egg) from your white fabric.
  • Wrap the silk covered egg with your plain white fabric and secure it with another piece of jute string.
    • The purpose of the white fabric is to cinch your silk as close as possible to the egg, reducing the amount of possible untouched spots on the egg.  Any of those spots that do not have silk touching them will result in no print.  You can use almost any kind of white fabric BUT I suggest using an old white t-shirt.  This fabric was perfect for cinching because of it's ability to be tugged and stretched tightly.  I was even able to tug and manipulate the fabric further after having tied the jute string.  I highly recommend the t-shirt!

  • Place wrapped eggs into a pan and fill pan with enough water to completely cover eggs.
  • Add four tablespoons of vinegar to the water.
  • Bring water to a boil and then reduce heat.  Allow water to simmer for 20 minutes. 
    • Please note you may need to cook the eggs longer if you plan on eating them.  I do not eat eggs (yuck) and am uncertain as to how much time is required if they will be eatten.
  • Remove your eggs from water and allow to cool.
  • Gently untie and remove both fabrics from your eggs.


I had read that you can rub your eggs with vegetable oil to make them shiny.  I was originally planning to do that but then decided to give it a try and really liked how much better it made the eggs look.  Of course I'm an impatient guy so rather than drag out the bottle of oil and mess with it I grabbed my can of pan spray, gave each egg a shot of spray and then gently rubbed it around the entire egg with a piece of paper towel.  LOL


    Sunday, March 18, 2012

    Moss That Inspires...Through Words

    I was serious in my first moss blog when I said that I had intentions to moss anything and everything.  I absolutely LOVE these sheets of moss.  I have spent some weeks looking at my mantel...which always looks so bare and empty after I take Christmas down.  I've been thinking spring as I decide what to do next around the house and my obsession with moss keeps kicking in.

    I decided to do something different with the mantel and went to Hobby Lobby and purchased a bunch of the large chip board letters.  I got letters to spell a few different words so I had options to choose from.  The word that won (for the time being at least) was FAMILY.  I have a large family picture on the mantel that helped me choose my word.


    Other great word possibilities...faith, laugh, love, grin, hope, dream, smile, believe,

    Supplies
    Chip board letters
    Moss
    Glue
    Ruler or straight edge
    Scissors and utility knife
    Paint
    Paint brush


    Instructions
    • Paint the edges of your letters so that they match the covering you are putting on the front.  I made sure that I also painted a small part of the front edge of the letter so that it blended in just in case the moss didn't cover exactly.
    • I took a yard stick and precut strips from my moss sheet.  There were only two different widths with the letters I had chosen for my word.  I took those strips and started applying them to my letters with regular white glue.

    • After gluing on one piece, I'd flip the letter upside down and trim off any excess moss with my craft knife.
    • Repeat the same steps for the next uncovered spot on your letter.  This sheeting is so pliable.  You can easily lay one piece next to another and manipulate it with your fingers to hide any seem marks.


    • Seam spots with tricky angles were easy.  I simply glued the newest strip of moss into place and then used my ruler as a guide to make a clean cut where the pieces overlapped and a seam should be.  Your craft knife will be very helpful for this trimming.


    • Flip your letters upside down and do any necessary trimming with your craft knife. 
    If you have any bare spots, just grab some of the pieces of moss laying around on your workstation and glue them in.  This material is very forgiving and is easy to work with.  Messy...but easy.  LOL

    I still have some things I'd like to do to finish dressing up the mantel for spring but here's a peek at what I've got going right now...along with my new moss letters.

    Saturday, March 17, 2012

    Have a safe and happy St. Patrick's Day!


    Check back soon to see my super cool dyed Easter eggs!

    Wednesday, March 14, 2012

    Yo-Yo Quilt Pillow

    I was fortunate to have a really close relationship with my grandma.  We spent a lot of time together when I was young.  She was always sewing and crocheting...doing a little of everything.  I learned how to do so many of these things because of the time we spent together.

    I am the more sentimental one in my family and I tend to inherit belongings and such that are passed around.  Not too long ago I was doing some purging in my basement and I ran across a tote full of things I wasn't aware I had.  Grandma was a pastor and this tote had pads of paper with sermon notes, pens from her desk...a little bit of everything.  Down under all of the stuff I found pieces of a yo-yo quilt she had started and never finished.  She would work on that quilt while she set for hours a day, visiting grandpa in the nursing home.  She used a butter dish lid as her pattern for the pieces to the quilt.  I helped her trace and cut many pieces for those quilts.

    There were a couple of whole sections in the tote (even one section with her threaded needle still hooked on) as well as a few half finished pieces.  I love making projects with sentimental value and decided to take the partial pieces of quilt section apart and make them into pillows to give to my mother and two aunts. 


    I'm not sure that I'd have the patience to make these circular pieces myself but I have found that some craft stores sell pre-made yo-yo pieces.  If you'd like to make your own Yo-Yo Flower Pillow you can either make or purchase the pieces.

    Supplies
    Pillow case (either purchased or made)
    Yo-yo pieces
    Green ribbon for stems
    Green fabric for leaves
    Scissors
    Sewing machine
    Thread and needle

    Instructions
    • Decide the layout of your flowers by placing the pieces on your pillow front
    • Do the same with your green ribbon stems.
    • Remove yo-yo pieces and sew down your ribbon stems on the sewing machine.  I adjusted my machine to a wide zigzag stich.
    • Trim the excess ribbon that hangs over the edge of your pillow.
    • Place your yo-yo pieces at the top of each stem and stich them down.  I used a simple tack stich around the outside edge of the piece.  I put about five stiches around each piece to keep them laying flat when the pillow is inserted.

    • Once completed, sew pillow together and stuff.

    Friday, March 9, 2012

    Paper Mache Eggs

    If you follow my Christmas blog The Christmas Guy you'll find that I make a lot of ornaments and decor from vintage books and hymnal pages.  I've decided to use those paper mediums while on my current spring/Easter decor journey. 

    I took standard plastic Easter eggs in different sizes and did a basic paper mache technique using the pages from my vintage books and hymnals.  The end result of this project left me with something to use for Easter decor that looks very vintage yet timeless.  This technique can be done with whatever type or print or paper you choose.  Try making these eggs using a paper that matches the decor already in your home and you'll have the perfect Easter accents to pull out and use every year...for years to come.  I really like how these turned out but wait until you see the next batch of eggs I've decorated.  They are definetely worth a return visit to my blog. 

    These were made from a vintage book.

    These eggs were covered from pages from a vintage hymnal.


    Possible paper options: vintage books, brown paper bags, newspaper, sheet music, comics, favorite wrapping paper, scrapbooking paper...

    Supplies
    Paper of choice
    Plastic eggs
    White glue
    Water
    Bowl
    Something to balance an egg on (I used an old glass taper candle holder)
    Scissor and craft knife (if your eggs have "hinges" on them)
    Scotch tape

    Here's a picture of my very fancy egg holding tool.  It made this sticky job much easier.


    Instructions
    • Shred your paper.  I was careful to shred my in very uneven, odd shaped pieces in order to add dimension to my eggs

    • Prepare your plastic eggs by taping them closed to ensure that they won't open.
      • If your egg has a small plastic piece holding the top and bottom together then it must be removed.  To do so simply cut the tab with scissors and then shave away any plastic sticking out from the egg with a craft knife.  Doing this will allow you to have a smooth even surface.

    • Create your glue mixture in a bowl by mixing approximately two (2) parts glue to one (1) part water.

    • Begin attaching your torn paper piece by piece to the egg.  You need to cover both sides of every piece applied with the glue mixture.  The best way to do this is to keep a small amount of the mixture on your thumb and index finger on BOTH hands.  This allows you to pick up a piece of paper at a time, rub it in between yoru fingers to apply the glue and then place the paper on the egg.
      • You will find as you get into a groove that it is most beneficial while covering your egg to have your fingers wet with glue.  If not, your dry fingers will stick to pieces already applied to the egg and the paper will be pulled off the egg.
      • Because the surface isn't flat, pieces will not lay perefectly flat.  Apply a few pieces and then lightly go back to other pieces and smooth them down with your fingers.  They will have become more pliable as the glue soaks into the paper.

      • Cover only the top half of your egg and allow it to dry completely.
      • Once dry, flip over and repeat the same steps to the other side.
      You may choose to dress your completed eggs up a little by adding glitter and or other things such as ribbon and flowers.  Glitter can easily be added by brushing on a layer of the glue mixture and covering with loose glitter or by spraying it with any canned glitter.

      Wednesday, March 7, 2012

      Etched Mirror Ornament...From Christmas To Spring

      I'm all about trying new things lately and I've been curious about etching on glass.  I found these cute mirror ornaments for $0.50 a piece at Michael's after Christmas and decided to use them to give etching a try.  I considered etching snowflakes onto the them but then decided that I was in the mood for spring...so I etched SPRING onto it instead.


      Supplies
      Glass or mirrored piece
      Etching cream (I got mine cheap at Hobby Lobby with a 40% off coupon)
      Paint brush
      Stencil (I used Contact Paper but stickers or tapes would also work)
      Credit card
      Instructions
      • Place your stencil or stickers onto your piece.  I cut mine out of Contact Paper using the Cricut.  You can easily cut your own with scissors or any craft knife.  You can also use any stickers or any other medium that masks off the positive or negative space you wish to treat.
      • I used a credit card to run across my stencil to ensure that it was sufficiently stuck onto the surface.

      • Apply your etching medium with a paint brush.

      • The instructions on the bottle said to let the cream sit for 5 minutes.  That was not near enough time for the process to happen.  I left it on for about 30 to 45 minutes and then rinsed with water.
      • Gently peel away stencil.

      • I wasn't impressed with the etching upon removing the stencil.  I went online to research and found that the etching process continues a little further after the cream has been removed.  After about an hour or two the final etch looked good.  I wish they would have said that on the bottle. 
      • I replaced the silver ribbon with a more spring approriate colored ribbon and it's ready to hang.

        Saturday, March 3, 2012

        Personalized Painted Pillows

        I have been working on a pile of different pillow projects.  I've started several and have been struggling to find time to finish them up.  Part of this one was for a gift for my mother (who's birthday was last week).  I was sewing the night before in order to get it done in time to give her.  Typical for any of my projects with a time deadline...LOL

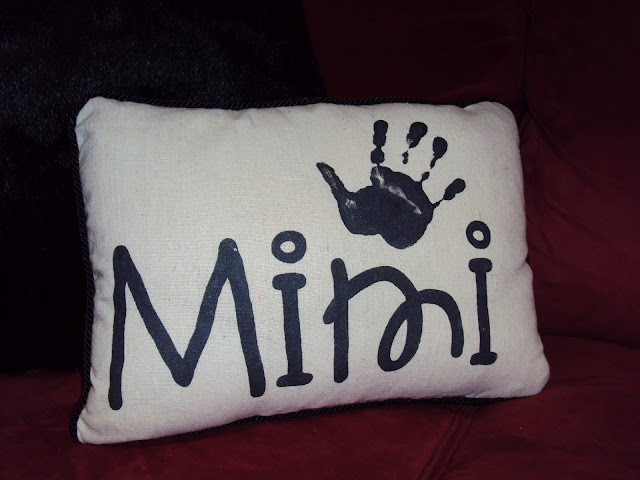
        I have been experimenting with painting on fabric.  I'm constantly doing some sort of project with my five year old niece and thought this pillow would be a perfect gift for her to give to my mother on her birthday.  You can find TONS of "grandma" and "grandpa" stuff out there but Kylie calls my mom "Mimi" and that isn't so easy to find.  I decided that we would make something on our own.

        Supplies
        Pillow case (purchased or made...I made this one myself)
        Pillow
        Cardstock or vinyl (to make stencil from) or a pre-made stencil of your choice
        Fabric paint
        Paint brush
        Scissors (I cheated and used my Cricut)
        Tape

        Instructions
        • If you choose to make your own stencil, first cut your words or graphic out of heavy cardstock or vinyl.  I used my Cricut and cut my word out of Contact Paper. 
        • Place your stencil onto the part of your pillow fabric or case that you wish to paint.  My stencil stuck to the fabric because I was using Contact Paper.  If you use a plastic or paper stencil you may wish to tape it into place to keep it from moving.
          • Please remember that most fabrics are thin enough that your paint will bleed through.  Be sure to place something under the fabric to keep any bleeding from staining your workspace.
        • Lightly apply paint in a straight up and down motion.  This will keep you from pulling the threads of the fabric and distorting the open areas of your stencil.
          • Be careful not to apply heavy amounts of paint at one time.  Doing so may result in the fabric absorbing excess paint and seeping beyond the edges of your stencil. 
        • Carefully remove your stencil once you have reach the desired paint coverage.  I wanted a solid print with this pillow but you may choose to go with a lighter amount of paint, leaving some of the fabric exposed.
        • I wanted to make this pillow even more personal by having Kylie stamp her handprint onto the pillow.  We used the same fabric paint.
        This was a right-before-bedtime project and clearly not so much a planned blog photo op...we were in our pj's and headed to bed.  LOL
        • Follow the instructions on your fabric paint bottle to allow sufficient dry time.  Once dry, simply complete your pillow by sewing it together or adding the pillow if you're using a premade pillowcase.

        This made for a really fun, personalized gift.  My first trial pillow is shown in the pic below.  These can be made as simple or as elaborate as you'd like.  These were also the first pillows I've ever made with piping.  I'll eventually get that project posted.